Happy Easter lovelies!!!!
Hope you girls (or guys) are enjoying your Easter long weekend with heaps of Easter bunnies and eggs!!! Unlike yours truly, who has to spend her entire long weekend nerding for my upcoming CA exam. How the very interesting. I did however, had some fun on Thursday night drinking up and dancing the night away after a rather shit week and a few retail therapies in the past couple of days. Do expect upcoming haul posts, albeit it will probably take a while since I need to be cramming hard in the next 2 weeks.
ANYHOOS,
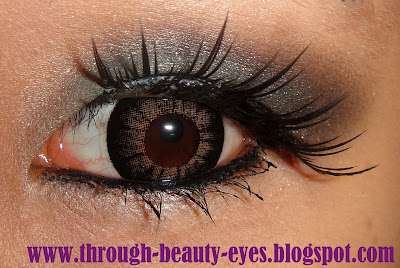
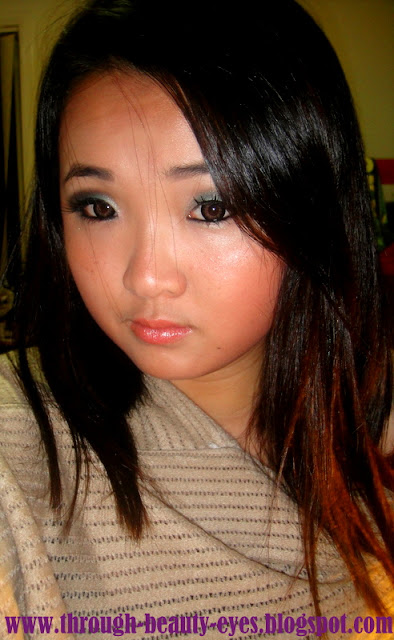
This is my Peacock Smokey Eyes that I worn during my friend's birthday dinner at Masuya last Saturday.
It has been a while since I last gone out on a Saturday night and a while since I last created a look with a touch of colour, that is out of my usual neutrals and brown. :)
Here is my step-by-step blog-torial on how to re-create this look:
STEP 1: Apply MAC Paint Pot in Bare Study after applying Urban Decay Primer Potion (You can use any eyeshadow primers you own. But don't skip this step as the last thing you want is your bright colours to crease).
STEP 2: Apply "lid colour" from Maybelline Stylish Smokes Quad in Natural Smokes all over your lid.
STEP 3: Apply "crease colour" from the same quad along your crease and outer crease.
STEP 4: Apply "Outer V colour" from the same quad at your outer V. Don't forget to blend all the colours with a clean blending brush.
(Not in picture) - Apply "highlight colour" from the same quad on your browbone area.
STEP 5: Apply the "bright green colour" from the Cover Girl Eye Enhancer Eyeshadow Quad in Tropica Fusion (or any bright green colour will do) on the inner 1/3 of your lid.
STEP 6: Apply the "dark blue colour" from the same CG quad on the middle of your lid.
STEP 7: Blend all the colours together using the same blending blush. As you can tell, most of the colours were blended out and the green&blue colour cannot really be seen.
STEP 8: I had to reapply the green and blue colour, but using Wet & Wild Colour Icon Palette in Pride (swatches and review HERE) this time.
SMOKEY EYES MAKE UP TIP 101: Keep blending blending blending!
A smokey eyes with harsh lines is definitely not sexy, so remember to keep blending until you blend all the harsh lines away. :)
STEP 9: Apply black gel eyeliner and wing it out a little on your upper lash line and line your lower lash line with your favourite smudge proof black pencil eyeliner. I used Maybelline Eyestudio Drama Lasting Gel Eyeliner and Urban Decay 24/7 Eye Pencil in Zero, which are my favourite HG eyeliners. Don't forget to apply mascara and fill in your eyebrows.
Your eye make up is pretty much done and you can start contouring your face if you are not going for the super dramatic eye look.
If you are, move on to the next step - apply falsies.
See what a huge difference falsies will make to the entire look?
Apart from giving the more dramatic effect to the look, falsies definitely opens up your eyes and gives the illusion that your eyes are bigger.
Whilst I am not dedicated enough to put on falsies daily but falsies is a must for me when it comes to night make up and Fridays too. :)
Products used on my FACE:
Face of Australia Mineral Therapy Liquid Foundation in Beige
Face of Australia Translucent Loose Powder
Australis Liquid Concealer Pen in Light Beige
MAC Wonder Woman MSF in Golden Lariat
On my LIPS:
Rimmel Lasting Finish Lipstick in Nude Pink (Swatches & Review HERE)
Revlon Super Lustrous Lipgloss in Nude Lustre
Since I got quite a few responses from my GIVEAWAY (which is still going btw, don't forget to enter =P) to post more Outfit of the Day photos, here is a collage of my outfit of the night:
Although corporate wear is fun at times, I do miss casual dressings HEAPS, especially during winter - think tights with boots, GRANNY SWEATERS (which I have been lemming for a while but am trying to justify paying over $50 for something I will wear probably once every week), hoodies.... Ah well....
I hope this tutorial is helpful to your guys :) You can always swap the green and blue with your favourite colours - pink, purple, turquoise, whatever floats your boat. =)
Are you a falsies person?
Do you wear them daily, only when you have a night out (likes your truly) or never?
Don't forget to enter my GIVEAWAY if you haven't already :)
XOXO,
A


7 comments:
Thanks for this beautiful tutorial! Your eyes look simply amazing! WOW
XOXO from a new follower here,
Catanya
I always wear lashes with my makeup - no makeup; no lashes. But if I wear makeup, I definitely wear lashes! I'd probably have gone for a fuller lash with this look, but I love the colors you used! (and the lenses!) ^^v
LOVE the colours you used in this look!
wow great blending work! i love falsies but i dont wear them ENOUGH lol coz im not really good at it, but looking at u, i am always inspire do it!
xoxo elle
wow the CG palettes must be very pigmented to go over the brown and still be that vibrant! Great look :)
@Catanya - Thanks for following and hope this tutorial helped you :)
@ 나니 - I wish I am more dedicated to wearing lashes. =P
@Emily - Thanks babe :)
@Wifluvelle - I am still not really good at it but practice makes perfect! You should definitely wear it more often!! xx
@NicNic - The CG palette was washed out a little I had to reapply those colours using the Wet & Wild Color Icon Palette, which is way MORE pigmented and lasting power is way better too! :)
In my case I choose and apply the eye lashes in an appropriate manner. Since I don't want to apply a lot of it and end up looking like a peacock.
Post a Comment