Showing posts with label FOTD Challenge. Show all posts

Monday, June 16, 2014

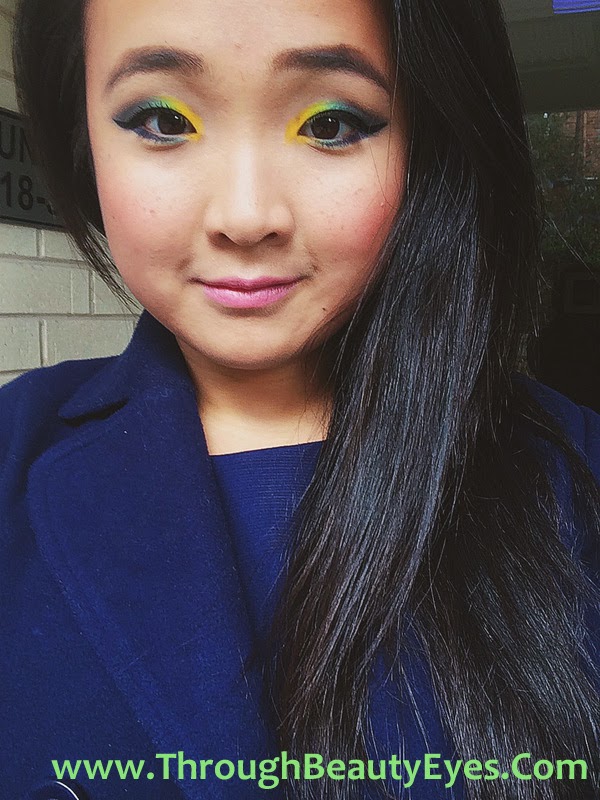
2014 #FIFAWorldCup Inspired MakeUp #1 - Brazil

So, World Cup fever doesn’t necessarily have to revolve around the actual soccer ball (or football) itself.

 Especially for us chicas, the FIFA world cup gives us more reasons to rock bright and colourful looks during the tournament. (Not that we need any reasons to – but as I grow older, I tend to stay on the “safe side” and haven’t been exploring colourful FOTD as much as I used to do. Is it just me or are there anyone else with me? :P) 

So,after a random playtime and experiment last Friday in conjunction with the open ceromony of 2014 Brazil FIFA World Cup, I decided to create this ThroughBeautyEyes 2014 FIFA World Cup Inspired Make Up series. 


This series will consist of make up based on the World Cup theme over the couse of this tournament - not neccessarily in the order of countries I support! 


ThroughBeautyEyes 2014 #FIFAWorldCup Inspired MakeUp - Brazil


Of course, Brazil will be the first instalment in this series, being the host country and all ;)

Illamasqua Fundamental Palette | INGLOT Freedom Palette | Wet n Wild Eyeshadow Palette in Pride
These are the palettes I used to create this look but feel free to make use of whatever colours you have in your stash - all you need is bright yellow, green and dark blue eyeshadows. AND of course, a very good blending blush!

EYES 

Urban Decay Primer Potion 
NYX Jumbo Pencil in Milk
Maybelline Colour Tattoo in Edgy Emerald
Face of Australia Eye Brow Kit
Dolly Wink Liquid Liner 
(I replaced it with Face of Australia Budge Proof Gel Liner in Brilliant Blue in my step-to-step tutorial guide)
Dolly Wink Volume Mascara in Black
YELLOW (#1) | Illamasqua Fundamental Palette - Powder shadow in Hype (#1)
GREEN | INGLOT Eyeshadow (#2) + Wet n Wild eyeshadow palette in Pride (#3)
BLUE | Wet n Wild eyeshadow palette in Pride (#4)


STEP BY STEP TUTORIAL:
2014 #FIFAWorldCup Inspired MakeUp - Brazil 


1. After priming your eyes with a primer and set the base with a cream eyeshadow (I used NYX Jumbo Eye Pencil in Milk and Maybelline Colour Tattoo in Edgy Emerald here), gently pack on the green eyeshadow on the centre of the lid, leaving out the inner and outter corner of your eyes.

2. Then, apply the dark blue eyeshadow at the outter corner of your eyes, creating a "V" shape and bringing it slightly into your crease.

3. Next, apply a bright matte yellow eyeshadow (using Illamasqua Hype from the Fundamental Palette) at the inner corner of your eyes, dragging it down to your inner tear duct area/ lower lash line.

4. BLEND, BLEND & BLEND all three colours together. You may lose some of the intensity of the colours, just go back and pack on more colours and blend it until there are no harsh lines and reached the intensity you are looking for.

5. Line your upper lash line with either a black or dark blue eyeliner and create a wing.

6. Then, line 1/3 of your bottom lash line with the same eyeliner and connect it to the wing.

7. Set the eyeliner with the same blue eyeshadow that you use on your outter V.

8. Line the middle (1/3) of your lower lash line with the green eyeshadow you used on your eyelid.


To finish off the look, apply a few generous coats of your favourite mascara (mine is Dolly Wink volume mascara - no surprises here) and to magnify the effect of this look, you may add on some falsies but I wasn't quite up for that. ;)

FACE 

Benefit That Girl Primer
Physician Formula Organic Wear CC Cream in Light & Medium
Cover Girl & Olay Simply Ageless Concealer in 215
Illamasqua Katie Blush
Face of Australia Limited Edition Glamazon Contour (For Bronzer & Highlight)
MAC MSF in Medium

You can easily transform from day to night with a different lip colour! :P

Wearing FoA Lasting Looks Lip Creme in Permanently Pink

FROM DAY: Wearing a baby pink lips 


Wearing FoA Lasting Looks Lip Creme in Love Berry

TO NIGHT: By amping it up with a fuchsia lips!

Hope you enjoyed this tutorial and you should definitely give it a go!
(Don't forget to hashtag #2014FIFAWorldCupMakeUp if you decided to join the fun!)

I am quite lucky to be work in a rather casual environment - that means no warning letter for rocking up to work with these colours. :P

What countries would you like to see next?

XOXO,
A

Monday, March 12, 2012

10-MINUTES FOTD CHALLENGE & Sunday Quickies


What up?

Hope you guys had a great weekend! 
I had a pretty relaxing weekend (read: I have done jack shit =.=") and god bless the glorious weekend weather after a terrible storm that hit the Sydney shore last Thursday. :D

Cosmopolitan; Havaianas; Sheridan Beach Towel; Coogee

Being an avid beach lover, how can I miss getting a good ol' Vitamin D-soaking sesh and playtime with the waves? 

I think I am close to being a chocolate bar now but am absolutely loving my tan! If only it stays this awesome for the next 6 months! #AGirlCanDream

:+:+:+:+:+:+:+:+:+:+:+:+:+:+:


So, after a scrumptious yumcha session with the uni crew at some ungodly hour on Sunday (9:30am on a Sunday is classified as ungodly in my dictionary.), I managed to squeeze in a mini haul before hitting the b-e-a-c-h. 

Sunday Mini Haulage
- Charity bracelet - "peace" and "believe"from RUBI - BIG ideas note book from TYPO to motivate myself to write down any ideas/ inspirations that come to mind and/or sight - 3 pair of heels from RUBI -

Before giving me the "WTF, is she crazy" look, these pretty heels were selling for $10 per pair and their heels are of perfect height for work. Its hard to go past them, really. Moreover, I do *kinda* need working heels as 99.9% of my heels collections have an average height of 4 inches. Not quite work appropriate, me thinks.

RRP AUD5 with any purchase in store (TYPO)
Tell me how gorgeous this PINK Eiffel tower iPhone casing is!!! :P
Super love <3 

:+:+:+:+:+:+:+:+:+:+:+:+:+:+:

As the title suggests, I challenged myself to finish a full make up (including eyes, lips and face; excluding any skin care applications) within 10 minutes. I have been snoozing my alarm more often than ever in the past couple of weeks and I have no other choice but to take my own sweet time to be creative with my FOTD. =/ I think there's a 5 minutes challenge that was going around a while ago but we gotta be realistic sometimes - 5 minutes is mission impossible LOL

10 minutes Make Up Challenge

Here's a quick breakdown of the products used:

EYES
Urban Decay Primer Potion
Bloom Eye Crayon in Taupe*
Sisley Phyoto Ombre´ E´clat in Stardust* 
Canmake Waterproof Liquid Eyeliner in Black
Maybelline Hello Kitty Volume Express Mascara in Black
Rimmel Eyebrow Pencil in Hazelnut

LIPS
Rimmel Moisture Renew Lipstick in Vintage Pink
(A long lost love! I am currently into cooler-toned pink lippie with purple undertone again and I have been wearing this for the past week!)

FACE
SkinFood Aloe Vera BB Cream in #2
Maybelline Instant Age-Rewind Skin Correcter in Nude
Marjolica Marjoca Puff de Cheeks in OR302
Sports Girl Oh My Goddess Bronzer
Jane Iredale In Touch Highlighter in Complete*
VOILA! 
Simple and quick make up = a younger and more innocent Adeline. :)

Love the final results of this <10minutes FOTD.
It will probably be my "on-the-go" look with probably different lip colour every week, or even day!

 Sisley Phyoto Ombre´ E´clat in Stardust is an absolute gem and works perfectly as an over the lid colour! (Review and swatches coming this week!)

I challenge everyone of you to do the 10 minutes FOTD challenge. :P

How long does it take you to apply your daily make up?
Does it take you less or more than 10 minutes? 

Don't forget to leave your link below if you took up the challenge! Would love to check it out!

Disclaimer: Products marked with * are press samples. 

XOXO,


Thursday, January 12, 2012

FOTD Challenge - Mermaid Inspired Step-by-Step Tutorial


Finally, a FOTD post after my last FOTD post, which was over a month ago. #FailBeautyBlogger right here. And to be honest, these FOTD shots have been sitting in my Picasa Export folder for quite a while, probably growing fungus. And when I saw Sara-May's FOTD Challenge 1 - Mermaid Inspired on her spanking new site - Make Up Utopia (Go check it out ladies if you haven't already! It's fantabulous! :D), I knew straightaway that I no longer have any excuse to procrastinate further, even though I am still on vacation. #Dedication

So, before proceeding to a series of pik-chas, what first comes to your mind when you think about mermaid? For me, its something within the pink and purple family (the mermaid's top) with a hint of aqua blue (which represents the ocean).


Here is my take on the Mermaid-Inspired look I had on Melbourne Cup last year - with a combination of coral-red, violety-purple and aqua using my trusty INGLOT palettes. 

My beloved INGLOT palettes purchased during IMATS/ABBW2011
#1 - Matte coral-red 
#2 - Matte taupe-ish shade with purple undertone
#3 - Matte violet-y purple
#4 - Shimmery Champagne Pearl
#5 - Matte Aqua 

My apologies for the # identification as I do not have these palettes with me at the moment. Just leave me a comment or tweet me (@ThruBeautyEyes) if you would like the exact code for any colours above (This is WHY I absolutely hate number coded beauty products!)


Of course, natural-looking falsies to give a more dramatic effect. I know its an obvious contradiction there - I want the luscious lash effect without looking like a drag queen ( I had to work before lunch and hence over-dramatic make up is a big no no!) You wouldn't want an extremely dramatic, doll lashes which will probably steal the thunder of your eye make up by covering majority of them, would you?

So, HOW TO RECREATE THIS LOOK?


STEP 1: First and the most important step - PRIME YOUR EYE LIDS & LOWER LASHLINE. It ensures your eyeshadows stay on all day without creasing and increases the intensity of your colours, appearing more vibrant. [Urban Decay Primer Potion]

STEP 2: Apply a creme shadow base (of the similar colour you intend to apply all over your lid). This step is optional. However, I like to apply a layer of creme shadow of my lid colour to further increase the intensity of the colours. [MAC Paint Pot in Coral Crepe]

STEP 3: Apply Colour #1 over the 2/3 of your lid. (I gently pack on this colour rather than brushing it all over to avoid excessive fall outs as matte eyeshadows are generally chalkier than shimmery colours.)

STEP 4: Apply Colour #2 on the outer corner of your lid, creating a "V" shape and bringing it into the centre of my crease. 

STEP 5: Gently pack on Colour #3 at the "cross section" of Colour #1 and #2 to create a gradient, transitioning effect. 

STEP 6: Using a fluffy, blending brush, blend the three colours together to blend away all the harsh line. Feel free to go back and pack on the colours if the colours faded from the blending. Keep repeating until you reach the intensity you want. [Rae Morris #7" Deluxe Precision Shader]*

STEP 7: Once you're happy with Step 6, using a smaller blending brush, apply colour #4 on the inner corner of your crease and blend away. Don't forget to apply the same colour on the inner third of your lower lash line to brighten up the look. 

STEP 8: Line your lower lash line with a creamy aqua pencil liner and apply colour #5 to set the liner. [Milani Liquif'eye Metallic Eyeliner]

STEP 9: Don't worry, you're almost there! Line your upper lash line with your favourite gel liner, apply your favourite mascara before applying a natural-looking falsies. [Maybelline Studio Drama Lasting Gel Liner in Black]

It should look something like that now =P

PRODUCTS USED/ MENTIONED: 

EYES
Urban Decay Primer Potion
MAC Paint Pot in Coral Crepe
INGLOT Freedom Palette (Colours used as mentioned above)
Maybelline Studio Drama Lasting Gel Liner in Black
Falsies
Shu Uemura Eyebrow Pencil in Hard

FACE
Maybelline FIT ME concealer in Light
Illamasqua Skin Base Foundation
Nude by Nature Mineral Powder in Medium*
Illamasqua Powder Blush in Lover*
Nude By Nature Mineral Bronzer*
MAC MSF in Candlelight
Nude By Nature Finishing Veil*

LIPS
Australis Colour Inject Mineral Lipstick in Hokey Pokey*


FINAL LOOK :D


Feather-y fascinator I wore that day along with my "cheating-put-your-hair-up-in-a-bun" curls.

A close-up of my fascinator. :)


Hope you enjoy and like this look! Let me know if you decide to try something similar! :)

What's YOUR interpretation on mermaid?
Have you created any mermaid-inspired look lately?


PS: Don't forget to enter my Kiwiberry Giveaway for a chance to win circle lenses, falsies and a 50% voucher HERE

PPS: My vacation is coming to an end soon. :( Missing Sydney but definitely not missing work! 

Disclaimer: Products marked with asterisk(*) were sent to me for consideration purposes and/or received as a gift from an event or in goodie bags. 


XOXO,
A


LinkWithin